The common belief that props are for « beginners » or the « weak » is the single biggest barrier to rebuilding functional strength; the truth is they are biofeedback tools for intelligent practice.
- Using a wall provides the nervous system with clear stability signals, allowing muscles to engage correctly instead of guarding out of fear.
- Precise alignment, learned with the help of props, protects vulnerable joints like knees and the spine while targeting the correct muscles for strength.
Recommendation: Instead of avoiding poses, learn to modify them with props to retrain your body’s proprioception and build strength that translates directly into daily stability and confidence.
For many who have cherished a yoga practice, the creeping fear of a fall can feel like a betrayal. A practice that once brought freedom and strength now seems fraught with risk. You may have been told to « just do chair yoga » or to « be careful, » but this advice often misses the point. It addresses the symptom—the fear—but not the root cause: a loss of the confident, coordinated strength required for balance. This leads many to stop practicing altogether, accelerating the very decline they fear.
The conventional approach often frames props like walls, blocks, and straps as crutches, temporary aids for those who are not yet « strong enough. » But what if this perspective is fundamentally flawed? What if the key to rebuilding unshakable leg strength and balance lies not in avoiding support, but in using it with intelligence? From an Iyengar perspective, props are not signs of weakness; they are precision instruments for neuromuscular re-education. They provide your body with the clear feedback needed to bypass fear, correct alignment, and re-engage muscles in a safe, effective way.
This article will guide you through the principles of using props as tools for building true, functional strength. We will deconstruct common poses that pose a risk for seniors and show you how to modify them to protect your joints while maximizing benefit. You will learn why leg strength is your foundation for independence, how to adapt your practice for conditions like osteoporosis, and ultimately, how to translate that strength into the confidence to put your socks on standing up. This is not about retreating from your practice; it’s about advancing it with wisdom.
To help you navigate this comprehensive guide, we have structured the information to build from the foundational « why » to the practical « how. » The following sections will provide you with the knowledge and tools to reclaim your practice with confidence and intelligence.
Summary: A Precise Guide to Rebuilding Strength and Balance with Yoga
- Why Leg Strength Is the #1 Factor in Staying Out of a Care Home?
- Why You Must Bend Your Knees in Forward Folds After 60?
- Pigeon Pose Alternatives: How to Open Hips Without Twisting Knees?
- Yoga or Pilates: Which Is Better for Arthritic Spines?
- How Deep Should You Twist with Osteoporosis in the Spine?
- Blocks and Straps: Essential Tools or Crutches for the Weak?
- How to Put Your Socks on Standing Up at Age 75?
- British Wheel of Yoga or Local Gym: Who Is Qualified to Teach Seniors?
Why Leg Strength Is the #1 Factor in Staying Out of a Care Home?
The conversation about healthy aging often revolves around cardiovascular health or mental acuity, but the bedrock of independence is far more grounded: leg strength. The ability to stand up from a chair, climb a flight of stairs, or recover from a stumble is not a matter of luck; it is a direct function of the power in your quadriceps, hamstrings, and glutes. As we age, the natural decline in muscle mass, a condition known as sarcopenia, directly impacts our stability and resilience. This isn’t just an inconvenience; it’s a critical safety issue.
The statistics are sobering. According to the Centers for Disease Control and Prevention, more than one in four adults aged 65 and older falls each year, and these events are a leading cause of both fatal and nonfatal injuries. A fall can initiate a devastating cascade of events, from a hip fracture to a prolonged hospital stay and a subsequent loss of confidence that leads to a more sedentary lifestyle. This cycle is precisely what contributes to the loss of independence. As a research team from the National Institutes of Health noted:
Age-associated loss of muscle mass (sarcopenia) and strength (dynapenia) is associated with a loss of independence that contributes to falls, fractures, and nursing home admissions.
– National Institutes of Health Research Team, Leg strength declines with advancing age despite habitual endurance exercise in active older adults
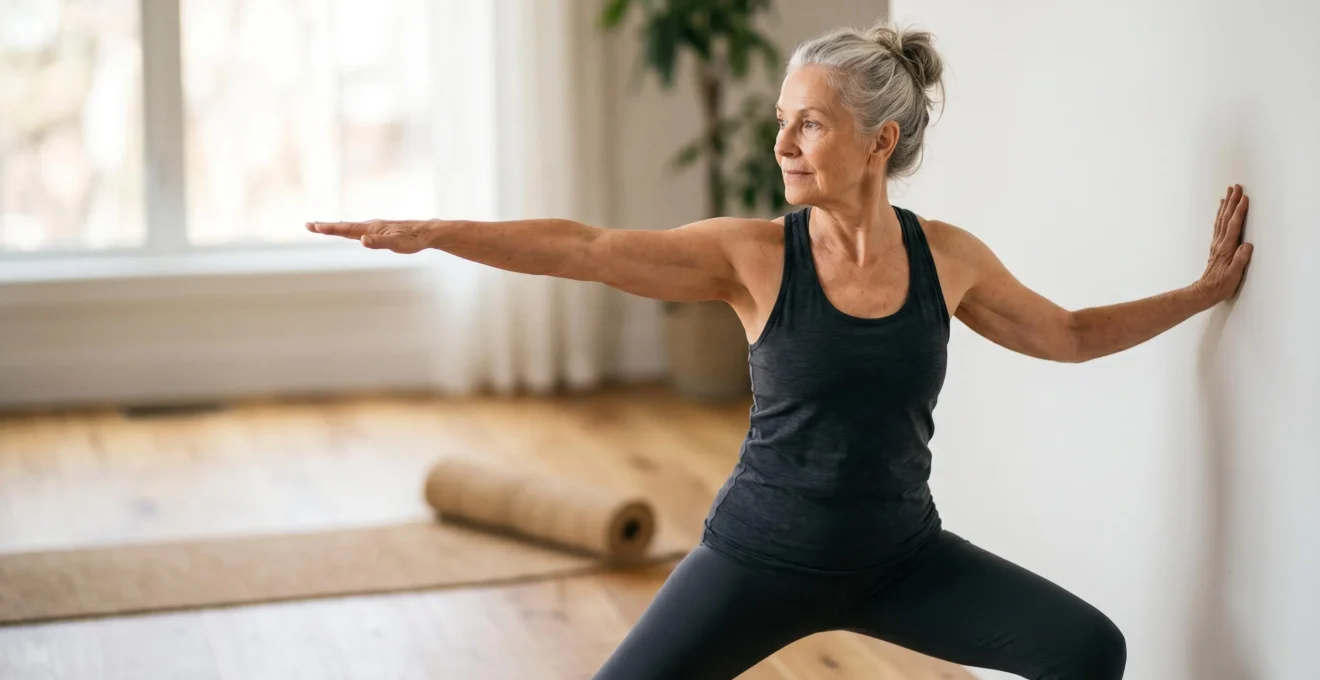
However, this decline is not inevitable. Building and maintaining leg strength is the single most effective intervention to prevent this loss. Poses like Warrior II, particularly when stabilized with a wall, directly target the muscles responsible for standing, walking, and balance. They provide a safe, controlled way to apply resistance and stimulate neuromuscular re-education, teaching your body to be strong and stable on its feet. This isn’t just exercise; it’s a direct investment in your long-term autonomy.
Why You Must Bend Your Knees in Forward Folds After 60?
The standing forward fold, or Uttanasana, is often taught with an emphasis on achieving straight legs to « get a deep hamstring stretch. » For a senior practitioner, especially one returning to yoga, this instruction is not only unhelpful but potentially dangerous. After 60, hamstring and lower back tightness is common, and forcing the legs straight in a forward fold places immense strain on the lumbar spine and, critically, on the sciatic nerve. Instead of releasing tension, it can create compression and irritation.
Bending the knees generously is not a « cheat » or a modification for beginners; it is the intelligent and correct way to perform the pose. This simple adjustment accomplishes two crucial things. First, it completely releases the tension in the lower back, allowing the spine to lengthen and decompress safely. Second, it allows for a gentle and controlled « nerve glide » for the sciatic nerve, which runs down the back of the leg. For those experiencing sciatica, this is one of the most effective and simple steps for management, as it encourages the nerve to move freely within its sheath rather than being yanked or compressed.
This illustration demonstrates the proper technique, focusing on spinal release rather than hamstring strain.
By bending your knees, you shift the focus of the pose from a potentially harmful hamstring pull to a safe spinal release and a therapeutic action for the sciatic nerve. You are prioritizing the health of your nervous system and your vertebral discs over an aesthetic goal of straight legs. This is a hallmark of a mature and wise practice: understanding the « why » behind the alignment to make the pose work for your body, not the other way around.
Pigeon Pose Alternatives: How to Open Hips Without Twisting Knees?
Pigeon Pose (Eka Pada Rajakapotasana) is lauded for its ability to open the hips, but it carries a significant risk, particularly for bodies with tight hips or previous knee injuries. The pose requires a high degree of external rotation from the hip joint. If the hip cannot provide this rotation, the body will compensate by forcing the rotation at the next available joint: the knee. The knee, however, is a hinge joint, designed for flexion and extension, not for twisting.
This compensation places dangerous torque on the ligaments and cartilage of the knee. As explained by the experts at YOGABODY, this can be a direct path to injury.
If your hip joint cannot rotate out to 90-degrees, your knee is forced to make up the difference which can cause injuries to the lateral collateral ligament (outer knee ligament) and a possible compression or tear of the inner knee cartilage (the medial meniscus).
– YOGABODY, What is Pigeon Pose? And How Do I Protect My Knees in It?
Fortunately, you can achieve the same hip-opening benefits without any of the risk by choosing intelligent alternatives. The key is to isolate the action in the hip joint and remove the knee from the equation. Two excellent and safe alternatives are:
- Figure-Four Stretch on Your Back (Sucirandhrasana): Lie on your back with your knees bent and feet flat on the floor. Cross your right ankle over your left thigh. If this is enough of a stretch, stay here. To deepen it, lift your left foot off the floor and gently pull your left thigh toward your chest. Your spine remains in a safe, neutral position, and your knee is completely protected.
- Seated Figure-Four Stretch: Sit tall in a sturdy chair. Cross your right ankle over your left thigh, keeping the right foot flexed to protect the knee. Gently press the right knee away from you. To deepen, hinge forward from your hips with a long, straight spine. This provides the exact same outer hip stretch as Pigeon Pose with zero risk of knee torque.
These alternatives are not « lesser » versions of Pigeon Pose; they are superior for most senior bodies because they deliver the benefit with precision and safety. They demonstrate a core principle of intelligent yoga: achieving the desired action in the target joint without causing collateral damage elsewhere.
Yoga or Pilates: Which Is Better for Arthritic Spines?
When dealing with spinal arthritis, the choice between yoga and Pilates can be confusing, as both are often recommended for improving mobility and reducing pain. The answer isn’t that one is universally « better, » but that each modality excels at addressing different symptoms and aspects of the condition. A precise, symptom-based approach is far more effective than a blanket recommendation. The best choice for you depends on your primary complaint: are you dealing more with pain, stiffness, or a feeling of weakness and instability?
Pilates, particularly when using equipment like the Reformer, is unparalleled for building deep core stability with minimal to zero spinal compression. It focuses on strengthening the transverse abdominis, the body’s natural corset, which provides crucial support for an arthritic spine. It is especially beneficial for those who experience pain with forward bending (flexion), as many Pilates exercises emphasize gentle spinal extension.
Yoga, on the other hand, is superior for addressing generalized stiffness and the chronic pain-stress cycle. Its focus on multi-directional movements and connecting breath with sensation (interoception) can gently increase range of motion and down-regulate the nervous system’s pain response. Restorative yoga, in particular, can be profoundly healing for managing chronic pain. The following table provides a clear decision matrix based on your specific symptoms.
| Your Primary Symptom | Recommended Primary Modality | Key Benefit | Example Exercise |
|---|---|---|---|
| Pain with forward bending (flexion) | Pilates | Focuses on spinal extension and deep core stability to counteract flexion-dominant patterns | Prone leg raises, Bridge exercises |
| Generalized stiffness and reduced mobility | Yoga | Gentle, multi-directional movements increase range of motion without excessive load | Modified Cat-Cow, Gentle standing poses |
| Weakness in stabilizing muscles | Pilates | Unparalleled for building deep core (transverse abdominis) to support the spine | Pelvic tilts, Supine heel taps |
| Chronic pain-stress cycle | Yoga | Superior for developing interoception (internal sensation awareness) and managing pain through breath and mindfulness | Restorative poses with breath focus |
| Need for zero spinal compression | Pilates (with Reformer equipment) | Exercises in horizontal plane with machine support eliminate gravitational spinal load | Reformer-based exercises |
Ultimately, a hybrid approach may be ideal. Using Pilates to build a foundation of core support can make a gentle yoga practice safer and more accessible. The key is to listen to your body and choose the modality that best addresses your most pressing needs, rather than adhering to a rigid dogma.
How Deep Should You Twist with Osteoporosis in the Spine?
For anyone diagnosed with osteoporosis or osteopenia, the instruction to « twist » in a yoga class should be met with extreme caution. The combination of forward flexion and rotation places significant compressive and shearing forces on the vertebral bodies, which can be enough to cause a compression fracture in bones with low density. Deep, leveraged twists—where one uses their arms to pull themselves deeper into the rotation—are absolutely contraindicated.
This does not mean all twisting is forbidden. Gentle, open-chest twists that originate from the thoracic (upper and mid) spine can be safe and beneficial, helping to maintain mobility. The key is to generate the movement from your core muscles, not from external force. As a Yoga International expert panel clarifies, the secret is muscular engagement, not leverage: « The tricks to twisting safely if you have osteoporosis are to engage the core during twists and to avoid manually forcing the spinal column into a twist position. » The range of motion will be much smaller, perhaps only 20-30 degrees of rotation, and that is perfectly acceptable. The goal is safe mobility, not maximal depth.
A seated chair twist is the safest and most effective way to practice this. The chair provides stability for the pelvis and lumbar spine, ensuring the rotation happens in the more mobile thoracic region. Follow this precise protocol to ensure safety.
Your Action Plan: Safe Seated Chair Twist for Osteoporosis
- Sit tall in a sturdy chair with feet flat on the floor, engaging your deep core muscles to create spinal length before any rotation begins.
- Place your hands in a « goalpost » position (arms bent at 90 degrees) to ensure rotation comes from the thoracic spine and shoulders, not from manually leveraging the lower back.
- On an inhalation, lengthen your spine upward; on a gentle exhalation, allow a minimal, organic rotation to occur naturally from the upper back.
- Use the chair back as a light reference point only, never pulling or forcing deeper. The chair immobilizes the vulnerable lumbar region while the thoracic spine gently rotates.
By following these steps, you are taking control of your practice. You are moving with intelligence and respect for your body’s condition, accessing the benefits of the twist without any of the associated risks. This is the essence of therapeutic yoga.
Blocks and Straps: Essential Tools or Crutches for the Weak?
There is a pervasive myth in the yoga world that using props is a sign of weakness or a crutch for those who can’t do the « full » pose. This ego-driven perspective is not only incorrect but also dangerous, as it encourages students to push beyond their safe range of motion. An Iyengar approach offers a radical reframe: props are not crutches; they are instruments of proprioception and intelligent alignment. They are biofeedback devices that give your nervous system the information it needs to practice with precision and safety.
When a former yogi stops practicing due to a fear of falling, it’s because their nervous system has learned a pattern of guarding and instability. Attempting a balance pose like Tree Pose (Vrksasana) unsupported can trigger this fear, causing muscles to tense up in a way that actually *prevents* balance. A prop, like a wall, short-circuits this fear response. By providing a stable reference point, the wall sends a clear signal of safety to the brain. This allows the nervous system to relax its guarding pattern and focus on engaging the correct stabilizing muscles in the standing leg. The prop doesn’t do the work for you; it creates the conditions under which your body can do the work correctly.
Case Study: Proprioception Enhancement Through Prop Use
A yoga instructor specializing in over-60s practice found that using a wall for Tree Pose support allowed students to hold the pose for progressively longer durations. The external feedback from the wall gave the nervous system clear grounding information, which paradoxically allowed students to engage their stabilizing muscles more effectively than attempting the pose unsupported, where fear of falling created muscular guarding patterns that prevented proper engagement.
The same principle applies to using a block under your hand in Triangle Pose (Trikonasana). The block doesn’t just make the floor « closer. » It provides a firm, stable surface to press into, activating the muscles in your arm and shoulder girdle and creating a line of energy that supports the entire pose. It teaches your body the feeling of correct alignment. These tools are not for the weak; they are for the wise. They are for the practitioner who is more interested in the internal integrity of the pose than its external appearance.
How to Put Your Socks on Standing Up at Age 75?
The seemingly simple act of putting on a sock while standing is a sophisticated ballet of strength, balance, and coordination. It requires the ability to stand stably on one leg, the hip mobility to lift and rotate the other leg, and the core control to bend forward without toppling over. Losing this ability is a significant marker of declining functional independence. The good news is that this is not an inevitable consequence of aging; it is a skill that can be maintained and even regained through targeted, functional training.
Rather than thinking of it as one daunting task, an Iyengar-based approach breaks the movement down into its core components. By practicing each component separately in a safe, supported way, you can rebuild the neuromuscular pathways and strength required for the complete action. This is not about « exercising » in the abstract; it’s about practicing the specific movements that build real-world capability. A simple yoga sequence, using a wall or chair for support, can systematically retrain your body for this very task.
This sequence breaks down the complex movement into four manageable components, each addressing a specific aspect of the « sock challenge. »
Your Action Plan: The Sock Prep Yoga Sequence
- Component 1 – Single-Leg Stability: Wall-supported Tree Pose – Stand with fingertips lightly touching a wall, shift weight to your left leg, and place your right foot on your inner left calf (never on the knee joint). Hold for 15-30 seconds, building trust in your leg’s strength. Repeat on the other side.
- Component 2 – Hip Flexion & External Rotation: Seated Figure-Four – Sit in a chair, cross your right ankle over your left thigh, and gently press the right knee away from your body. Lean forward with a straight spine until you feel a stretch in your outer hip. Hold for 20-30 seconds on each side.
- Component 3 – Spinal Flexion & Hand-to-Foot Coordination: Modified Standing Forward Fold – Stand facing a wall with hands on the wall at shoulder height. Step back, bend your knees generously, and fold forward, reaching one hand toward the opposite foot. This trains the movement pattern without a balance challenge.
- Component 4 – Balance Recovery Training: Single-leg Toe Taps – Standing near a wall for safety, balance on your left leg. Tap your right toe forward, then to the side, then to the back. This practices the loss and recovery of balance. Perform 5 taps in each direction, then switch legs.
Practicing this sequence regularly does more than just help you with your socks. It builds a foundation of functional strength and proprioceptive awareness that will improve your stability in all aspects of daily life, profoundly boosting your confidence and preserving your independence.
Key takeaways
- Leg strength is the single most important physical factor for maintaining independence and preventing falls in later life.
- Intelligent modification, such as bending knees in forward folds and using hip-opening alternatives to Pigeon Pose, is crucial for joint safety.
- Props like walls and blocks are not crutches but essential biofeedback tools that help retrain the nervous system for stability and correct alignment.
British Wheel of Yoga or Local Gym: Who Is Qualified to Teach Seniors?
As you reclaim your practice, the guidance of a qualified instructor is invaluable. However, not all yoga teachers are equipped to work safely and effectively with older adults. A standard 200-hour certification, while a good start, often provides only a superficial overview of the specific anatomical and physiological considerations for seniors. An instructor at a local gym may be excellent at teaching a vigorous vinyasa class but may lack the knowledge to modify poses for osteoporosis, arthritis, or balance issues.
Finding the right teacher requires you to become an informed consumer. You need to look beyond generic class descriptions and ask specific, targeted questions. A qualified teacher will not be offended by your inquiries; they will welcome them as a sign of an engaged and responsible student. They should be able to speak with confidence and precision about contraindications, modifications, and their specific training related to older populations. Organizations like the British Wheel of Yoga or specialized programs like « Yoga for Seniors » often offer more in-depth training, but the individual teacher’s experience and approach are what truly matter.
Your safety is paramount, and it is your right and responsibility to vet a potential instructor thoroughly. A truly qualified teacher creates an environment of safety, inquiry, and empowerment, where you feel supported in adapting the practice to your unique body. Use the following checklist to guide your conversation with any potential new teacher.
Checklist: 5 Essential Questions for a Senior Yoga Instructor
- Training & Certification: ‘What specific training or certifications do you have in teaching yoga for seniors, Chair Yoga, or Yoga for 55+?’ (Look for specialized credentials beyond a standard 200-hour RYT).
- Medical Condition Experience: ‘What is your experience working with students who have osteoporosis or low bone density? Can you explain which poses you modify or avoid for them?’
- Balance & Prop Protocol: ‘How do you adapt classes for students with balance issues, and what props or supports do you provide?’
- Contraindication Knowledge: ‘Can you explain the contraindications for forward folds, deep twists, and inversions for older adults?’
- Hands-On Adjustment Philosophy: ‘What is your philosophy on hands-on adjustments, and do you always ask for permission before touching students?’
A teacher who can answer these questions with clarity and detail is one who has invested in the specialized knowledge required to guide you safely. This diligence in choosing your instructor is as important as the practice itself.
To put these principles into practice, the next logical step is to find a qualified instructor who understands the nuances of teaching yoga for seniors. Use the checklist provided to confidently interview potential teachers and find one who can guide you on your journey to rebuilding strength and balance safely.